
Flows
Welcome to the heart of LaminarFlow: the Flow Builder. This powerful tool empowers you to construct your own logic, enabling the automation of extensive content generation in mere minutes.
Understanding the various Nodes and their interconnectivity is key to harnessing the full capabilities of the Flow Builder.
Important Limitations
Before you begin, it's crucial to be aware of certain constraints to manage your usage effectively:
- If you're on the Pro plan, remember to limit your API usage.
- Use the "Max Tokens" parameter to control the size of your queries.
- Set a maximum limit for token consumption per Flow execution to prevent overuse.
It's advisable to keep the execution time of your Flow as short as possible by limiting the number of Queries generated. Excessive execution time can disrupt the data flow and potentially cause the execution to fail, resulting in a waste of Units. This consideration becomes particularly important when dealing with expensive Nodes or resource-intensive Queries.
The maximum duration allowed for a Pipeline Run is currently set to 1 hour.
Getting Started with Flows
Flows are comprised of two essential elements:
Nodes

Nodes are the primary components of your Flow, divided into three categories:
- Input Nodes: These nodes initiate the flow of data.
- Question Nodes: Responsible for creating and processing queries.
- Output Nodes: These nodes handle the results of your queries, enabling you to save or update data efficiently.
Edges
Edges are the connectors that link various nodes, defining the path of data and control flow.

A typical Flow involves input nodes feeding data to a question node, which then processes and forwards the output to the output nodes. This streamlined process facilitates easy automation of content generation and updates.
Input Nodes
The available input nodes in LaminarFlow include:
- Local Lists: Manage data lists stored locally.
- Text: Raw text to use directly in your FLow.
- Input Files: Utilize data from various file formats.
- API URL: Retrieve data from specified API URLs.
- Web Browser: Gather data from the web (list of URLs).
- Newsroom: Retrieve news articles from the internet.
- Articles: Retrieve blog posts, news articles, or press releases from the web.
Local Lists
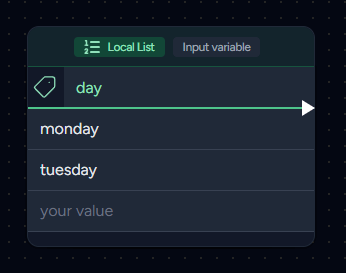
Local Lists are directly editable within your Flow. They consist of a key and an array of values. These lists operate in Input variable mode. If you're new to Input variables, don't worry – they're explained with easy-to-follow examples in the Data section. This will help you quickly become familiar with these concepts.
Local Lists are the simplest form of nodes. It's recommended to start with them when exploring input nodes.
Text
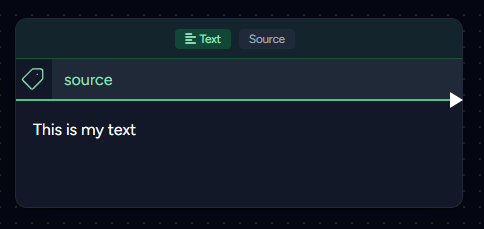
If you need to give the AI a text to process, you can simply copy/paste your text in this node. It supports up to 65500 characters. Text nodes are always in source mode.
Input Files
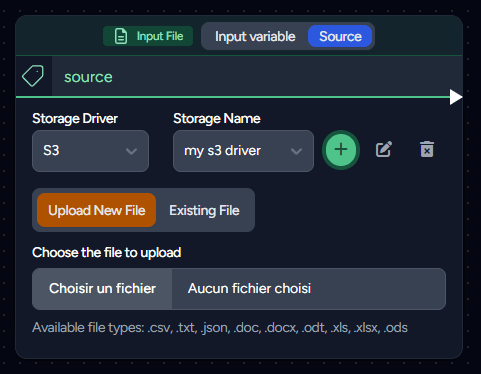
Your Flow can be enhanced with your own files. We support a variety of file types:
- .txt (Text File)
- .csv (Comma-separated Values File)
- .json (JavaScript Object Notation)
- .doc (Microsoft Word 97)
- .docx (Microsoft Word 2007)
- .odt (LibreOffice Writer or Apache OpenOffice Writer)
- .xls (Microsoft Excel 2003)
- .xlsx (Microsoft Excel 2007)
- .ods (OpenDocument Spreadsheet)
Adherence to the expected data structure is necessary, as detailed in the Data section.
You can utilize our provided storage (1GB per account) or opt for your own (S3, FTP, or SFTP). In the latter case, you'll need to input your credentials, which, once registered, can be used across different flows.
Rest assured, we encrypt your file content before storage on our servers.
API URL
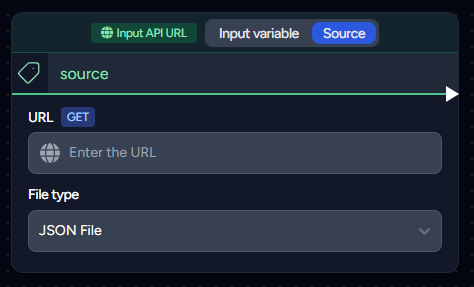
You also have the option to use the API URL Node as an alternative to the File Node. The API URL Node, restricted to using the GET method, is optimally designed for connecting with compatible APIs, facilitating the integration of dynamic data flows.
This node accepts the same file types as the File node. For simplicity and clarity, JSON format is recommended.
Web Browser
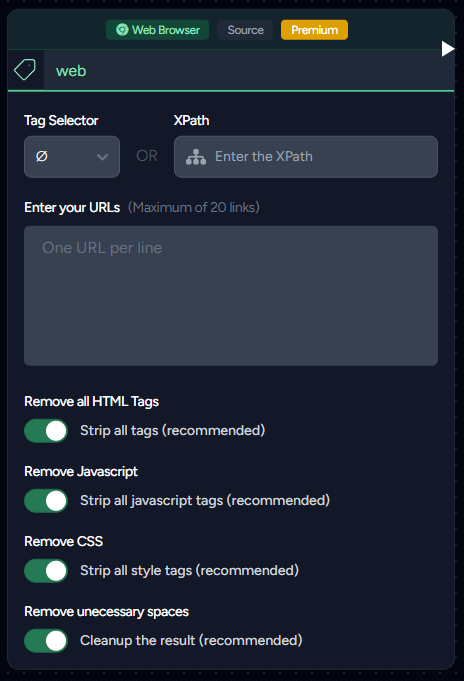
The Web Browser Node is a versatile tool for retrieving and processing web page content. It comes in two variants to suit different workflow needs:
Standard Web Browser (Green)
The traditional Web Browser Node allows you to input up to 20 URLs, each on a separate line. This node functions as a data source in your Flow.
Web Browser with Input (Blue)
The enhanced Web Browser Node that can accept input connections from other nodes. When connected to input sources, it processes URLs provided by connected nodes (such as Local Lists, Text nodes, API URLs, or other Web Browser nodes) instead of requiring manual URL entry.
Supported Input Connections
The Web Browser with Input can accept connections from:
- Local Lists: Process URLs from your defined lists
- Text Nodes: Extract URLs from text content (one URL per line)
- API URL Nodes: Use URLs retrieved from API responses
- Other Web Browser Nodes: Chain web scraping operations for complex data processing workflows
Features and Configuration
Both Web Browser variants offer the same powerful features:
- Tag Selector: Identifies specific tags within the page.
- XPath: For more experienced users, the XPath selector is available. However, if both Tag Selector and XPath are chosen, the XPath selection will be disregarded. If you need more information about XPath, you can visit this website.
- Remove all HTML Tags: Strips away all HTML tags in the document, for example,
<span>hello</span>becomeshello. - Remove all Javascript: Eliminates all content within
<script>tags. - Remove all CSS: Clears all content within
<style>tags, but does not affect inline styling (style="..."). - Remove all unnecessary spaces: Cleans up double spaces and spaces at the beginning and end of the document.
We highly recommend keeping all these removal options activated as suggested, unless you are certain about your actions and their implications.
Data Output Scenarios
Understanding the data output is crucial, and it typically occurs in two main scenarios:
-
Single URL with Tag Selector or XPath: If you set either a Tag Selector or an XPath and have just one URL, the output will be in an array format. For example, consider an HTML document from
URL1:<span>line number one</span> <span>line number two</span>With
spanas the Tag Selector, you will receive two separate outputs:line number oneline number two
-
Multiple URLs with Tag Selector or XPath: When you have multiple URLs and either a Tag Selector or XPath is set, the output will be a concatenation with one output per URL. Using the previous example and adding a second HTML document from
URL2:<span>something else from another URL</span> <span>this is good</span>The resulting output will be:
line number one line number twosomething else from another URL this is good
This approach may evolve based on user feedback, but it's currently effective because with a single URL, the typical goal is to iterate through the document for individual processing. When dealing with multiple URLs, the preference often is to have the AI process each URL's output separately.
Advanced Workflow Examples
Example 1: API → Web Browser → Question
API URL Node → Web Browser with Input → Question Node
Use an API to retrieve a list of URLs, then scrape each URL's content for AI processing.
Example 2: Chained Web Browsing
Web Browser A → Web Browser B → Question Node
First Web Browser extracts URLs from a webpage, second Web Browser scrapes those discovered URLs.
Example 3: Local List Processing
Local List → Web Browser with Input → Question Node
Process a predefined list of URLs stored in a Local List node.
Execution Order and Dependencies
Web Browser nodes with input connections automatically handle dependency resolution. The system ensures that:
- Input sources complete processing before dependent Web Browser nodes start
- Sequential execution is maintained (A → B → C flows properly)
- Failed dependencies properly stop the entire pipeline
This Node is available only to users who have subscribed to the Medium Plan or a higher tier.
Our service enables the collection of web pages built with JavaScript. Successful visits to each URL will incur a cost in Units, which varies depending on your current subscription plan:
The Newsroom Node: Automatic News Article Retrieval
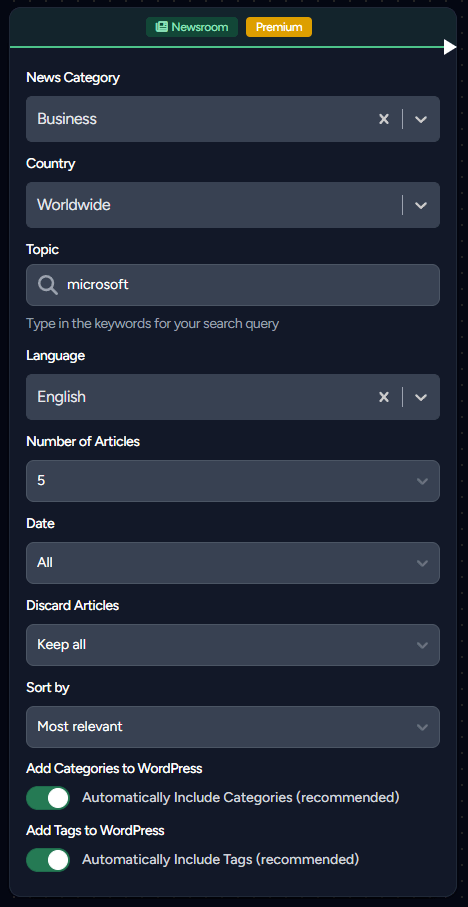
The Newsroom Node is designed for effortlessly sourcing news articles from the web, with a range of settings for customization:
-
News Category: Set the general subject of the articles.
-
Country: Choose the specific country to source articles from.
-
Keywords: Advanced keyword search with support for complex Boolean logic. You can create sophisticated queries using:
- Tag-based Interface: Simply type keywords and press Tab or Enter to create tags
- AND/OR Logic: Toggle between AND/OR operators for each keyword group
- Nested Groups: Create complex nested queries like
(AI OR "artificial intelligence") AND (tutorial OR guide) - Parentheses Support: Use parentheses to group related terms for precise control
- Mixed Logic: Combine different operators in the same query for maximum flexibility
Examples:
- Simple:
bitcoin,cryptocurrency,AI - Advanced:
(bitcoin OR cryptocurrency) AND (price OR value) - Complex:
((AI OR "artificial intelligence") AND tutorial) OR (machine learning AND guide)
-
Language: Select the desired language for the articles.
-
Number of Articles: Limit the number of articles to retrieve, with a maximum of 10.
-
Date: Options to fetch articles from the last week, month, or choose no date restrictions.
-
Discard Articles: Discard articles published beyond a specific time interval from the current moment.
-
Sort By: Organize articles by their relevance, publication date, source prominence, or shares on social media.
-
Add Categories to WordPress: Automatically integrate categories into your WordPress categories.
-
Add Tags to WordPress: Automatically add tags to your WordPress tags.
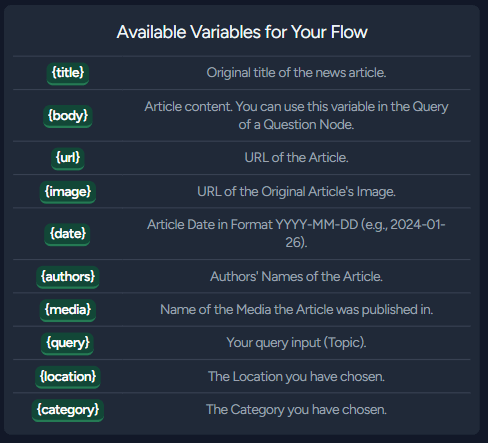
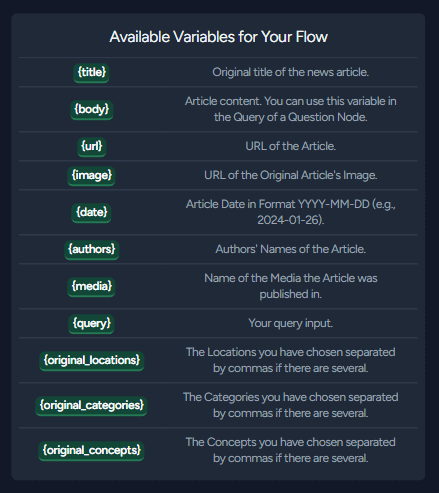
The Newsroom Node provides various variables that can be used in your workflow:
This Node operates alongside the Question Node. We suggest using the following available Presets for your Question:
[Newsroom] NO HTML - Rewrite the article[Newsroom] NO HTML - Rewrite the article with the original image[Newsroom] HTML - Rewrite the article[Newsroom] HTML - Rewrite the article with the original image
When opting to use the original image from the article, ensure you have the appropriate rights to use it. In this scenario, avoid activating the Add external images option in your Question Node.
Linking a Newsroom Node to a Question Node automatically sets the Question Node to Linear Mode (Input Mix Mode), ensuring the prevention of any potential conflicts.
In your WordPress Node, you can use the {title} variable in your Title field.
A comprehensive guide on creating a website using the Newsroom Node is available on Medium, offering step-by-step instructions.
Remember that all articles are protected by copyright laws. Ensure compliance with these laws and do not reuse others' work without explicit permission.
The Newsroom Node usage is billed per use, measured in Units. The cost varies depending on your chosen subscription plan:
The Articles Node
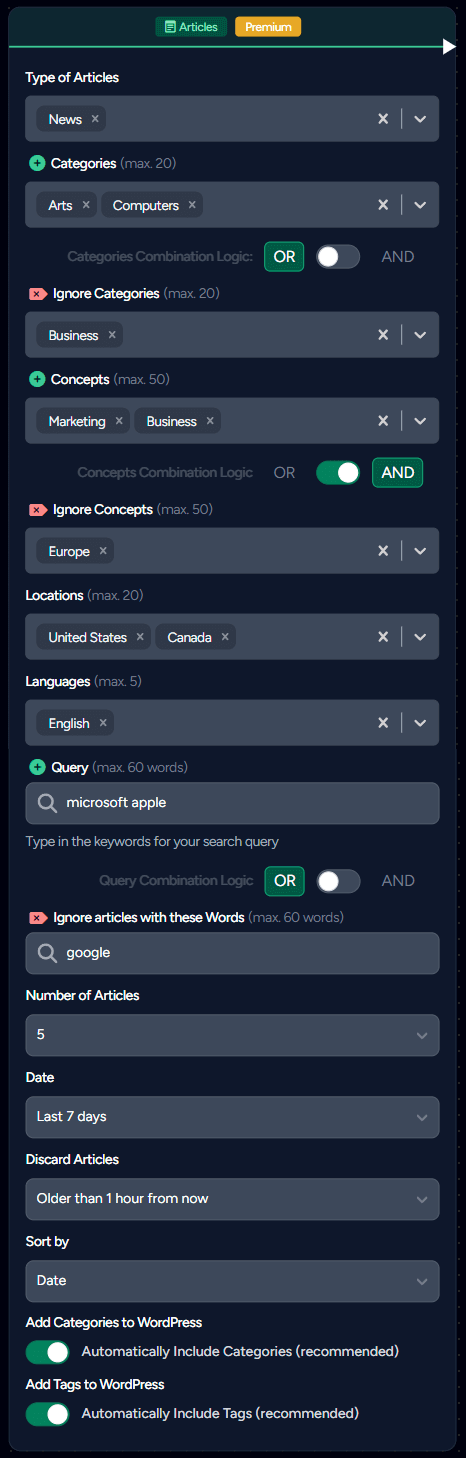
The Articles Node operates similarly to the Newsroom Node but offers far more options. You can select different sources (news, blogs, press releases) and choose from a very large number of subjects of interest. It's also possible to choose multiple locations, languages, categories, and concepts. The query system is more advanced than the Newsroom Node.
-
Type of Articles: Choose from "News", "Blogs", "Press Release", or any combination of them.
-
Categories: Choose one or multiple categories to fetch.
-
Ignore Categories: Exclude articles associated with any of these chosen Categories.
-
Categories Combination Logic: Lets you decide if you want all the selected categories to be present in the article or if having at least one matching category is sufficient.
-
Concepts: A concept can be a location or a topic that the article is about. You can combine concepts and categories to fine-tune your search.
-
Ignore Concepts: Exclude articles associated with any of these chosen Concepts.
-
Concepts Combination Logic: Determine how you want to combine your concepts for the search.
-
Locations: Find articles that describe something at a particular location.
-
Languages: Search for articles in one or more specified languages.
-
Query: Advanced keyword search with sophisticated Boolean logic support. Features include:
- Tag-based Interface: Type keywords and press Tab or Enter to create searchable tags
- AND/OR Logic: Toggle between AND/OR operators for precise query control
- Nested Groups: Build complex nested queries with parentheses like
(tech OR technology) AND (startup OR entrepreneur) - Mixed Logic: Combine different logical operators within the same query
- Real-time Preview: See your query structure as you build it
-
Ignore articles with these Words: Advanced exclusion system with full Boolean logic support:
- Complex Exclusions: Create sophisticated ignore patterns like
(spam OR advertisement) AND (promotion OR deal) - Nested Logic: Use parentheses to create precise exclusion rules
- Tag Interface: Same intuitive tag-based interface as the main query field
- Complex Exclusions: Create sophisticated ignore patterns like
-
Query Combination Logic: This setting is now replaced by the advanced in-line AND/OR toggles within the query builder interface, providing much more granular control over how keywords are combined.
-
Number of Articles: Set a limit on the number of articles to retrieve, with a maximum of 10.
-
Date: Options to fetch articles from the last week or month.
-
Discard Articles: Exclude articles published beyond a specific time interval from the current moment.
-
Sort By: Sort articles by their relevance, publication date, source prominence, or shares on social media.
-
Add Categories to WordPress: Automatically integrate categories into your WordPress site.
-
Add Tags to WordPress: Automatically add tags to your WordPress tags.
The Articles Node provides various variables that can be used in your workflow:
This Node operates alongside the Question Node. We suggest using the following available Presets for your Question:
[Newsroom] NO HTML - Rewrite the article[Newsroom] NO HTML - Rewrite the article with the original image[Newsroom] HTML - Rewrite the article[Newsroom] HTML - Rewrite the article with the original image
When opting to use the original image from the article, ensure you have the appropriate rights to use it. In this scenario, avoid activating the Add external images option in your Question Node.
Linking an Articles Node to a Question Node automatically sets the Question Node to Linear Mode (Input Mix Mode), ensuring the prevention of any potential conflicts.
In your WordPress Node, you can use the {title} variable in your Title field.
Advanced Query Building Examples
The keyword search system in both Newsroom and Articles nodes supports sophisticated Boolean logic:
Basic Queries:
bitcoin- Articles containing "bitcoin"AI, machine learning, technology- Articles containing any of these terms (OR logic)
Advanced Boolean Logic:
(bitcoin OR cryptocurrency) AND price- Articles about bitcoin or cryptocurrency that also mention priceAI AND (tutorial OR guide) AND NOT advanced- AI tutorials or guides, but exclude advanced content((climate OR environment) AND policy) OR (green AND energy)- Climate/environment policy OR green energy articles
Complex Nested Queries:
(AI OR "artificial intelligence") AND (startup OR entrepreneur) AND NOT (job OR hiring)- AI startup content excluding job postings((blockchain OR crypto) AND (news OR update)) OR ((bitcoin OR ethereum) AND price)- Blockchain news OR cryptocurrency price updates
Tips for Effective Queries:
- Use quotes for exact phrases:
"machine learning" - Group related terms with parentheses for precise control
- Use the ignore field to filter out unwanted content types
- Test with broader terms first, then refine for better results
Remember that all articles are protected by copyright laws. Ensure compliance with these laws and do not reuse others' work without explicit permission.
The Articles Node usage is billed per use, measured in Units. The cost varies depending on your chosen subscription plan:
Question nodes
You will use this node very often as this is where the magic happens.
The initial decision you'll face is selecting how to handle your inputs:
opting for either Linear or Product mode. Detailed insights on this crucial aspect are available in the
'Combination of multiple Inputs' chapter within the Data section of our documentation.
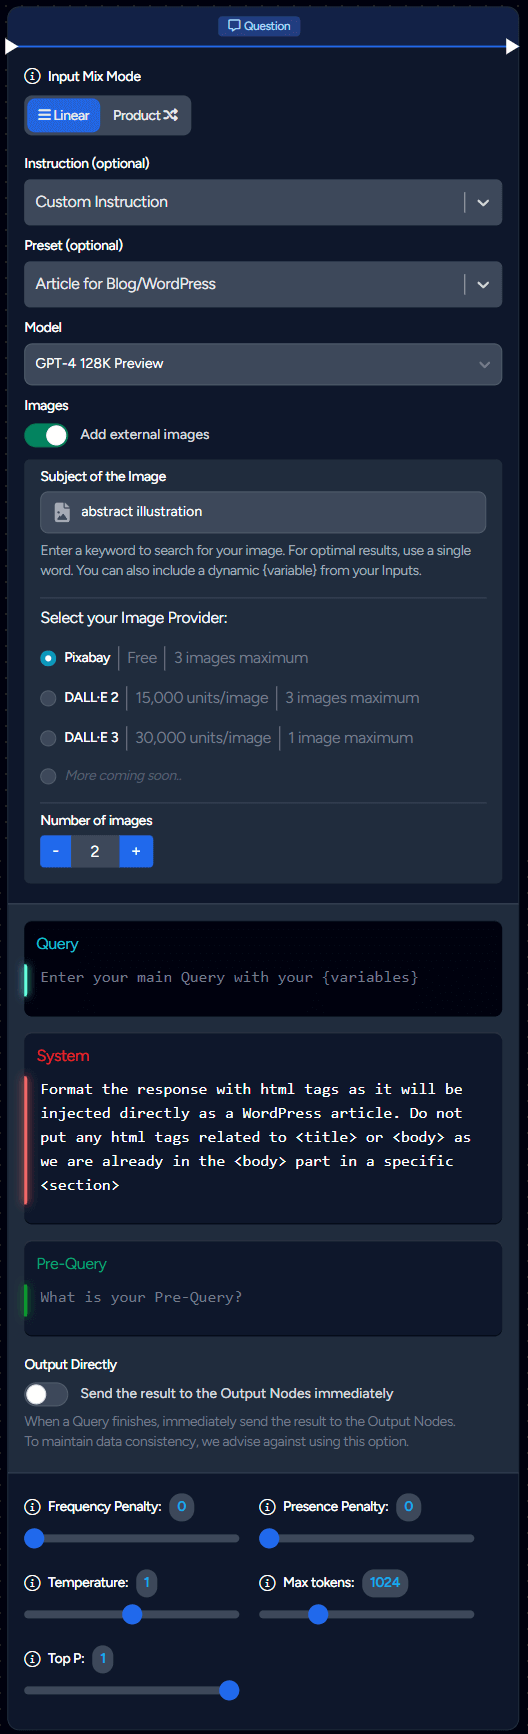
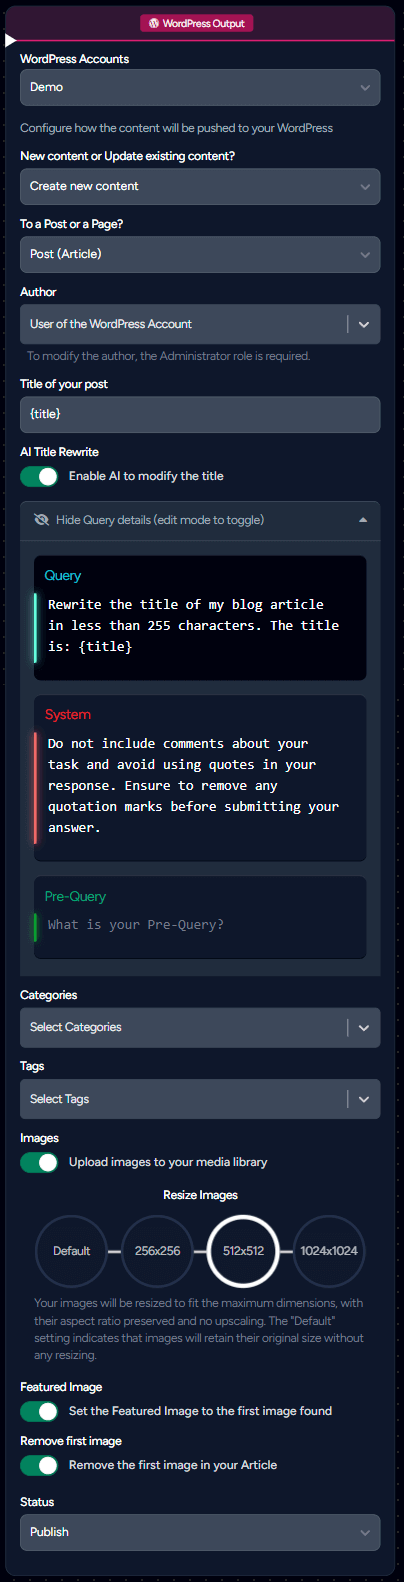
Images
To incorporate images into your article, simply activate the Add external images feature. This automatically appends <img> tags with relevant images based on your specified image query.
You need to select a GPT-4 model (or higher) to add images.
Additionally, you have the option to select from various image providers:
| Provider | Max per Query | Rate Limit |
|---|---|---|
| Pixabay | 3 | 20/min |
| GPT Image Mini | 3 | 20/min |
| GPT Image 2 | 1 | 1/min |
That's why if you use the Newsroom Node, we highly recommend using Pixabay or GPT Image Mini and not GPT Image 2 based on the Rate Limit.
Please be aware that when using the Newsroom Node and including the original article's image in your article, it's advisable not to enable the Add external images option.
When opting for AI-generated images, the default resolution is 1024x1024 pixels. It's necessary to enable the Upload images to your library feature in your CMS (WordPress) Node to ensure these images are uploaded. Failure to activate this option means the images will not be uploaded, rendering them inaccessible. However, you will still incur charges for their creation regardless of upload status.
For additional details on images in the WordPress Node, please refer to the Images section in our WordPress documentation.
Query
Prefill your Query, System, and Pre-Query fields by selecting an Instruction and/or a Preset, with the flexibility to edit as needed.
For detailed information on these fields and related settings (such as Frequency Penalty, Presence Penalty, etc.), please consult the Presets documentation.
You can opt to instantly send your Query's response to the connected Output Nodes of your Question Node as soon as it's available.
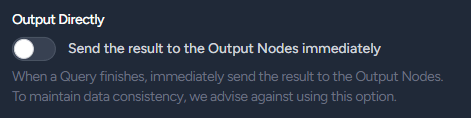
For instance, if you've generated 3 Queries in your Question Node, activating this option means the first completed Query will immediately be dispatched to the Outputs. Without this option, the Question Node waits for all Queries to conclude before forwarding results to the Output Nodes.
We recommend keeping this option deactivated to preserve data consistency. However, if you're concerned about the possibility of a single Query failure disrupting the entire Flow and preventing data output, activating this option may be beneficial. This is particularly relevant when using a Newsroom Node, as you wouldn’t want the entire Flow to fail due to an error that leads to no article being published.
Output Nodes
Direct your queries to various nodes for output:
Output File Nodes

Store your query outputs in a location of your choice. Use the Output Files node with your own S3, FTP, SFTP, or the provided LaminarFlow storage (1GB max).
To avoid file overwriting during subsequent Flow executions, enable the Append data to filename feature. This appends the date and time to your filename in the format: [your-filename]-YYYYMMDD-HHMMSS.
After exiting edit mode, you can access and download your files from the Flow History. Alternatively, within your Flow, simply click on Download Last File to download the most recent file, provided you have executed your Flow without any modifications."
Familiarize yourself with output formatting by reading the related documentation.
Output API URL
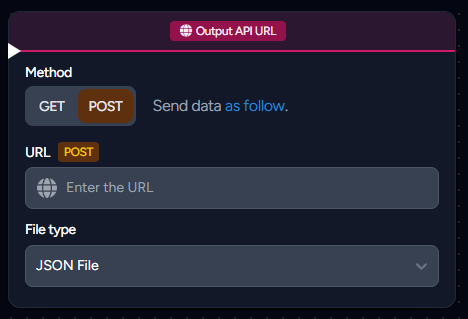
Effortlessly send GET or POST requests to your server or API using the Output URL node.
- Utilizing the
GETmethod functions like a webhook; it accesses the specified URL without transmitting extra data. - Employing the
POSTmethod, conversely, involves sending data adhering to a particular format. For comprehensive information on this, refer to the Data Output section in our documentation.
WordPress
The WordPress node proves invaluable for automating your publication workflow. Comprehensive information can be found on the specific documentation page dedicated to the WordPress node.
Question Link Nodes
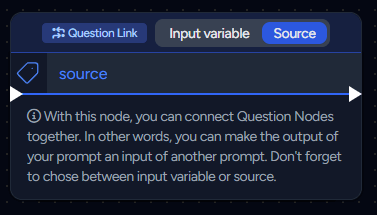
For more complex text generation, use this node to transfer the output from one Question Node to another.
Limitations
The Flow Builder currently has these limitations:
- A maximum of 30 nodes per Flow.
- Up to 3 Question Links per Flow.
These rules are established due to our ongoing optimization process. We anticipate easing these restrictions as our development progresses.
Emergency Unlock
While your Flow is running, it enters a "locked" state to prevent potential issues. While in this locked mode, editing your Flow is not possible.
Sometimes, during the execution of your Flow, unexpected issues may arise. In such situations, your Flow should automatically unlock itself. However, if it remains locked for over 5 minutes, and the expected runtime is not intended to be that long (although there are scenarios where a Flow running for more than 5 minutes is normal), you can manually unlock it by clicking the "Force Unlock" button. In this case, the Flow may still continue to run in the background, but you will regain the ability to edit and execute it again.