
WordPress
A standout feature of LaminarFlow is the WordPress node. This node allows for the automated transfer of content generated from your Questions directly to your blog, enabling the rapid creation of numerous automated articles or posts.
Connecting WordPress with LaminarFlow
Go to the User menu on the left side panel:
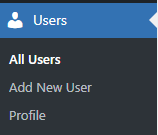
Next, chose an existing user or press the Add New User button located at the top to add one.
Here is an example of a user:

To start, link your website with LaminarFlow. In your blog's Users section, edit the account that will publish through WordPress.
At the form's conclusion, insert the application name (for instance, "laminarflow") in the New Application Password Name field. Afterward, click the Add New Application Password button to generate an API access password.
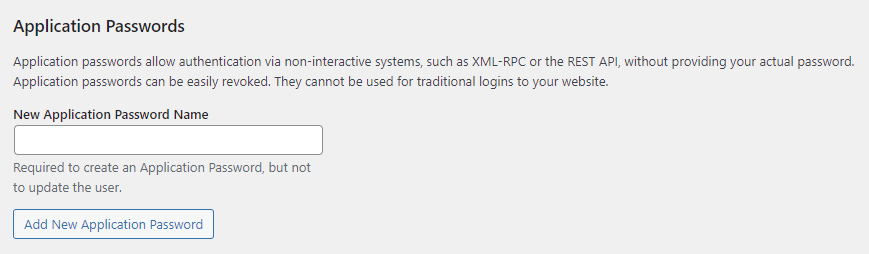
Now, you should see a box like this one:

And you should also have something like this at the end:

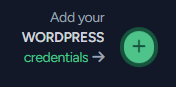
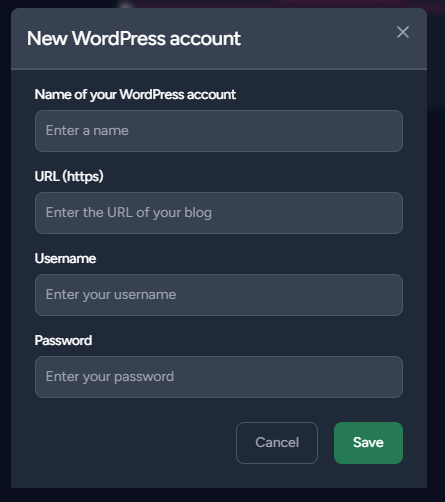
Then, in your Flow on LaminarFlow, add a WordPress node and input your credentials.
Here is an explanation of the fields you must complete:
- Name: You may provide your Blog's name
- URL: Enter your blog's root URL in this format
https://www.your-blog.com(exclude the trailing/) - Username: Input the username associated with the application password you added (in our example, it would be "patrick")

- Password: Use the generated password (in our example, it would be "fgDe U083 5het T0cQ 7RLC TaeW")
Creating a New Post or Article

When you link a Question node with a WordPress node, the output from the Question might produce various queries. Each response to these queries will trigger a corresponding action in your WordPress.
If you opt to create a new post or article for each query response, you can incorporate variables from your Inputs into the post/article's title.
Update a Post or an Article
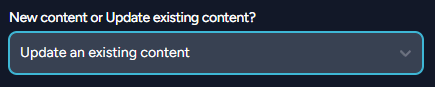
Choosing the Update mode can seem complex initially, but it will become clear as you read through this section.
Incorporating a custom-tag lets you update a specific part of your post or article.
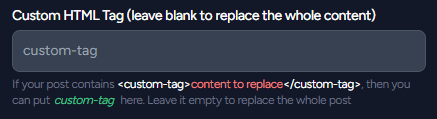
Without a custom-tag, the entire content will be overwritten. For optimal use of custom-tags and their correct formatting, see more details here:
If your content includes a <custom-tag> within a Raw HTML element managed by Visual Composer or WP Bakery, please enable this option:

Given that a Question might produce numerous query outputs, you need to decide which page or article to update based on your input variables. Directly select the post or article for updating in the WordPress node. Then, define the conditions for the update, listing all necessary variable names and their values to initiate the change.
Here's an example using inputs as Input variables:
First Input:
day
monday
tuesday
Second Input:
month
january
february
Query:
What is the next day after {day} and the month after {month}?
WordPress node:
Select the page for updating and specify day as the Variable name and tuesday as the Value. Click on the + button and add month as the Variable name and february as the Value. The update will occur only for the query:
What is the next day after tuesday and the month after february?
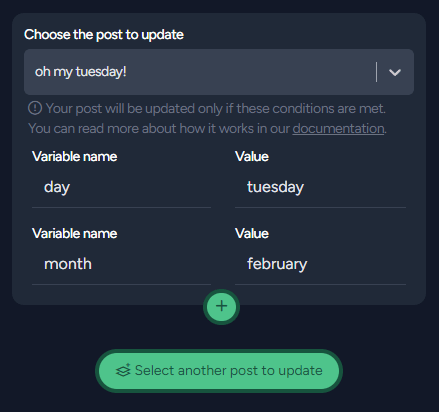
Furthermore, you can configure multiple pages to update for each query output generated by your Question. In essence, you can modify several pages or articles per query output, with each having its own set of custom rules.
We encourage you to experiment with these features to become familiar with the functionalities by practical application.
Author
If necessary, you have the ability to modify the author of your article. Initially, the username linked to your WordPress account, which is connected to your WordPress Node, will be utilized as the default author. To alter the author, the account's user role must be "Administrator" or higher.
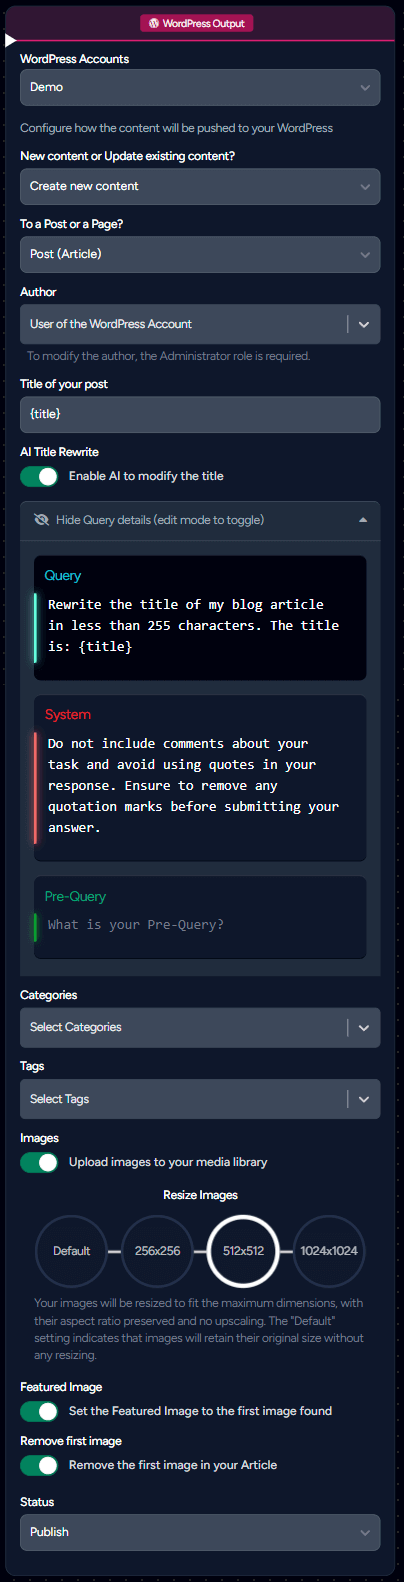
AI Title Rewrite

The AI can automatically revise your article's title, which is particularly beneficial for dynamic titles, such as those used with the Newsroom Node {title} variable. Title rewrites will be performed using the GPT-4 model and will incur charges accordingly.
When you activate Title Rewrite without providing a title, the AI will use your Question's output to create a suitable title.
If you activate this option and provide a Title, you can customize the Query of your Title rewrite. Inside the Query, you can use {title} and {output} variables. In that case, if you use {title}, it will refer to your "Title of your post/page" field, which can already include {title} that refers to the input variables from your Flow.
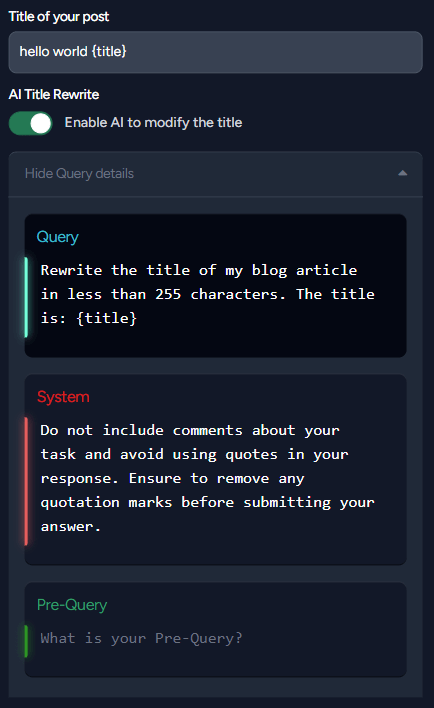
For example, imagine you have a Newsroom Node connected to your Flow. The variable {title} is automatically available in your WordPress Node. If you set your Title to
hello world {title}
and you activate the "AI Title Rewrite" with a Query of
Rewrite the title of my blog article in less than 255 characters.
The title is: {title}
The {title} in the Query does not refer to the same {title} in your "Title of your post/page" field. The Query that will be sent to the AI will be something like this:
Rewrite the title of my blog article in less than 255 characters.
The title is: hello world ON Semiconductor Corp. (ON) volume
hits 8.99 million: A New Opening for Investors
Typically, when utilizing a Newsroom Node or an Article Node, it's more straightforward to leave the "Title" field blank and simply refine your Query.
Images
We encourage you to incorporate images to your articles simply by activating the Add images on the Question Node.
When this feature is enabled, it becomes necessary to upload images directly to your media library. This is because, in most cases, external inclusions from remote websites are not permitted.
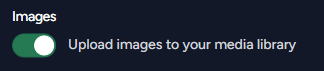
If you don't enable this option for AI-generated images, the image will be created and billed, but it won't be uploaded, resulting in its loss. Therefore, it's crucial to activate Upload images to your media library in such instances.
By selecting the Upload images to your media library feature, the process becomes seamless. We will automatically download the images, convert them if required, and then upload them to your WordPress media library. This ensures that the images are hosted internally rather than relying on external sources, simplifying image management and enhancing your article's reliability.
To resize images within your article, first activate the previous option, after which the following field will become visible:
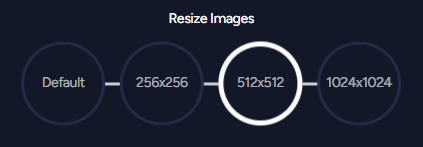
The Default setting indicates that images will retain their original size without any resizing.
Selecting a specific dimension means images will be resized to not exceed those limits, preserving their original aspect ratio and avoiding upscaling to maintain image quality and proportions.
Additionally, if your article includes images, you have the option to designate the first image as the featured image. In doing so, you might consider eliminating the first image from the article's body to prevent it from appearing twice (as both the featured image and the initial image) should your template's design necessitate it.
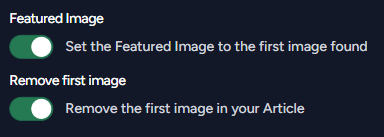
All these steps are efficiently handled for you, ensuring a smooth integration of images into your content.
Categories and Tags
You have the option to designate pre-existing categories and tags for your post or page. Should your chosen tag or category not already exist, it will be generated for you upon saving your Flow.
Dynamic Categories and Tags
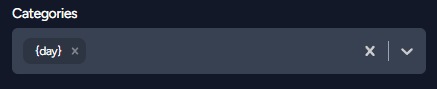
You can also incorporate variables from your Inputs into categories or tags by utilizing the {} notation. For instance, if you have a variable named day within your Input, you can employ {day} within your tags or categories. This will be automatically substituted with the current value of the variable, enabling you to create dynamic content based on your initial variables and categorize it on-the-fly.
WordPress Plugin
Utilizing a page builder often interferes with your content management, leading to the potential for unwanted modifications in your page or post structure. These changes can disrupt your layout, rendering it ineffective. To counteract this, we recommend installing the "Remove Content Filters for REST API" plugin that prevents any pre or post processing of your content through the WordPress API, ensuring your content’s structure remains unaltered.

Should you have enabled the Replace inside a Raw HTML Block setting for users of Visual Composer or WP Bakery Raw HTML Block, it's necessary to download and activate the plugin mentioned previously.
Plugin Installation Instructions:
- Download the provided file.
- Upload the
remove-content-filters.phpfile to your/wp-content/pluginsdirectory. - Navigate to Plugins > Installed Plugins in your Admin Dashboard.
- Activate the
Remove Content Filters for REST APIplugin.